The Ultimate Guide to Krunker Settings (Last Updated 6.17.20)
LAST UPDATED: 6.17.20 - still not complete but I’ll always be continually updating it.
If you’re looking for the best Krunker settings, you’ve come to the right place, except that the best settings are the ones that you pick for yourselves. If you want to copy/paste my settings, you can find them at philzgoodman.com/mod. But you will find that everyone has different gaming hardware and has their own prefernces. Luckily, Krunker is one of the most customizable games out there. So that’s why this guide focuses on explaining all the different settings.
Here is a complete guide to tuning your Krunker Settings, whether you’re on Mac, PC, or ChromeOS (as well as browser versus client). As a disclaimer, MANY of the settings come down to personal preference. In this guide, I will explain all the different settings and make some general recommendations. This guide will be updated on a regular basis when new settings come out. See the date in the title for the latest time updated.
TABLE OF CONTENTS
PRESET SETTING OPTIONS

These 4 buttons above are the “preset” settings. You don’t really want to bother using them because these settings don’t save, and chances are you are going to want to make tweaks to your settings. However, I’d say that the “pro” settings is a decent starting place for further customization. Note: once you make ANY change to the presets, you will be set to the “custom” mode. The presets cannot be saved!!
IMPORTANT: be careful about making changes to the presets as you risk overriding whatever is already in your “custom” settings. That’s why you should always back up your settings using the “export” feature as I’ll explain below.
THE TOP BUTTONS: CONTROLS, IMPORT, EXPORT, RESET, AND SEARCH BOX

CONTROLS: set your keybinds here. Mouse buttons can also be mapped. Currently, you can’t have dual keybinds unfortunately.
However, now you can have the ability to “toggle” on certain UI elements. This is cool added functionality. For example, if you want to do a Krunker movie, you can easily hide the Krunker UI. Or if you prefer to hide weapon on certain classes, let’s say you want to keep the weapon model on for the AK but hide with revolver when aiming, now you can just hit the toggle when you switch classes.

The new “toggle” control options lets you turn on/off certain settings quickly.
IMPORT: allows you to import the settings of either yourself or someone else that has provided the txt or code that contains their settings.
EXPORT: allows you to save your settings to a txt file to back them up. HIGHLY RECOMMENDED that you export your settings on a regular basis to back them up.
RESET: reverts settings to defaults.
SEARCH BOX: extremely useful since Krunker keeps adding more and more settings.
NETWORK

Lag compensation: this setting adjusts for situations where the server and the individual player are out of sync, for example in instances of high ping. The main reason to adjust this setting is if you are missing your shots when aiming at a moving target. You may find that you have to lead the target to manually adjust for the lag. Lag compensation adjusts this disconnect so that your shots should be more in sync (with the goal being that if you click on them, the hit should register.) If you have fast internet, keep this setting OFF. If you have lag, you need to adjust this setting gradually and manually until it starts to feel correct.
Auto-Routing (ON/OFF): the term “routing” means the path from you (the player) to the server. It’s unclear exactly what this default network path looks like. Conceptually, auto routing (like smart routing) uses a variety of factors to find the shortest path, or the path of least resistance to the server. For example, if one route has a high volume of traffic, it should send you to a better route. Since the exact details are unknown, just try to experiment with this setting on or off to see if it improves or worsens your ping. For me personally, it makes things worse.
The new high-tickrate setting is recommended to be turned ON. But you should test it out yourself because it could lead to both more bandwidth usage and also more CPU utilization.
LOCALIZATION
Default Region: simply sets the server region that you will join when the game automatically places you into a lobby. You can still join whichever server you’d like, regardless of which setting you choose here.
Language: currently English, Spanish, German, and Korean are supported.
PERFORMANCE SECTION (GRAPHICS)
Resolution Slider
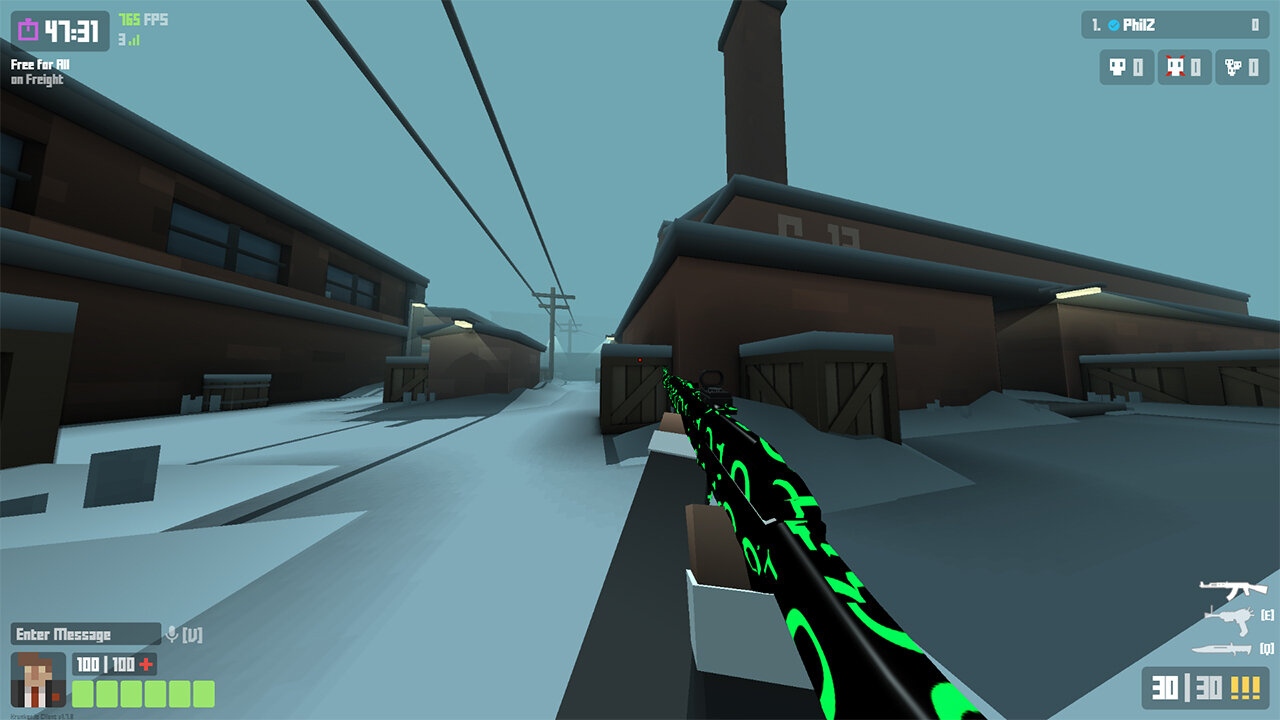
Adjust until you reach a stable frame rate. Krunker has a simple and clean style of graphics that makes it the perfect game to push high frame rates even on low-end PCs.
With Krunker, more players than ever before can enjoy the precision and fluid mouse control required in a first-person shooter. But first, how do you get high FPS in Krunker?
But first, we’re going to want to jump a head a bit: scroll down Settings until you see the “Show FPS” button. Enable this button.

Next, you want to adjust the Performance -> Resolution slider until you are getting high framerates. The resolution slider works by rendering the game at a fraction of whatever your PC’s base resolution is at. For example, if you are playing at 1920x1080, a Resolution setting of 0.6 would mean that the game is rendering at 6/10ths of 1920x1080.
In general, if you are using something like a Chromebook, keep the resolution between 0.3 and 0.6. If you are on a full-power laptop with integrated graphics, you’ll want between 0.5 and 0.8 resolution settings. For gaming laptops and desktop PCs, you can leave the setting at 1.

However, there is still benefit to supersampling (rendering the game at a higher resolution than your display’s resolution). It reduces aliasing (jagged lines around edges) and makes the game look sharper overall.
But since some of the game’s movement mechanics such as jump height and slide distance are currently tied to your PC’s FPS, most competitive players choose to keep graphics settings as low as tolerable to achieve insane framerates (even in the 1000s).
The vast majority of laptops and Chromebooks on the market are equipped with 60Hz displays. So the goal for this performance tuning is to maintain at least a stable 60fps. In theory, it may seem pointless to exceed 60FPS if your display is only 60Hz. However, this is not true. Even if we disregard the movement advantage of high FPS (which may be patched out or equalized in the future), you will still have reduced input lag if you have high frame rates. This makes mouse movements more fluid.
Enabling Unlimited FPS in Google Chrome in Mac & Windows
You can enable unlimited FPS in Google Chrome by right-clicking on the Chrome desktop or program icon, clicking “Properties”, and adding the command: add "--disable-frame-rate-limit" behind the target location.
Bonus: you can also try adding “--disable-gpu-vsync” after that (so it reads: --disable-frame-rate-limit --disable-gpu-vsync). Sometimes if you are playing with high refresh rate + high FPS, v-sync can mess up your frames. However, I am not yet certain when v-sync in Chrome is turned on or off, so I think most people won’t need this line command.

If you are using the official Krunker Client, there is an option for Unlimited FPS in the settings. You should be sure to turn that on.
Adjusting the Framerate Cap
You might be wondering about the Framerate Cap. In theory, this is a great idea. When I used to play Fortnite and Overwatch, I made sure to keep the framerate cap at a moderate level of 170 or 180 FPS. That is well above the frames I could “see” in my 144Hz monitor. Keeping a framerate cap preserves your PC’s resources and generates less heat from the CPU/GPU which results in more stable performance over long gaming sessions.
However, in Krunker, I found that keeping it on anything other than “0” (Off) or “1200” (Max) resulted in framerate drops across the board. (As of patch 1.8.9).
For now, I recommend not using this setting (keep it at 0).

Aspect Ratio
A relatively new setting, Aspect Ratio allows you to choose from a few pre-set resolutions as well as manually input your own. This allows for “stretched-res” settings. For the most part, I do not find custom resolutions necessary. I have a Full HD monitor so naturally I play on 1920x1080. That being said, here are a few reasons you may want to adjust your Aspect Ratio setting:
You want to play windowed and want to customize precisely the size of the window. For example, maybe you have a single monitor streaming setup - this would allow you to set a screen capture area equivalent to the Krunker window and the rest of your display will be private (things like chat, alerts, etc.)
You want to increase your framerate/performance by lowering the resolution. You can do this, but I find the resolution slider a bit easier - since it downscales, it keeps things native so that means faster ALT-TABs.
In Fortnite, using stretched-res used to be a way to gain an FOV advantage. I am not yet sure this is the case or not in Krunker. That being said, Krunker has a max FOV of 120 which is in my opinion, more than enough for most players.
The Rest of the Performance Settings: Low Spec, Particles, Shadows, Ambient Shading, Bullet Trails, Sniper Flap
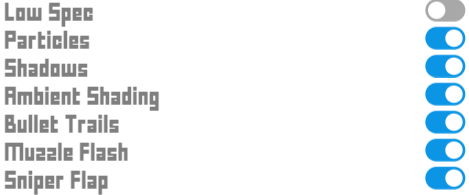
Low Spec: Disables the model of a player’s legs from being rendered to increase FPS.
Recommendation: OFF unless you have a very slow system - the affect of not showing legs reduces enemy visibility and also makes the game look strange.
Particles:
Recommendation: ON I like to keep this ON since it doesn’t hurt my performance but you can turn it OFF if you want more visibility and higher frames. These are things like bullet impacts on walls.
Particle Distance & Render Distance
A slider that sets the distance in order for the object to be rendered or not. You can set it somewhere in the middle if you’re going for max framerates. It’s not too big of a hit to performance though if you have these maxed.
Shadows: Renders dark areas where a light source is blocked.
Recommendation: DEPENDS. Turn it OFF for maximum frames since rendering shadows can hurt performance. Also, some people prefer it OFF for greater visibility. I prefer the look of the game with shadows ON.
Ambient Shading: Renders different levels of darkness on an object to give a sense of depth perception.
Recommendation: DEPENDS. Much like shadows, some people like the game to look as FLAT as possible and therefore would elect to turn off this setting. I keep it ON since I want to enjoy greater graphics quality.
Bullet Trails: Simulates the directional firing of projectiles.
Recommendation: ON. Although Krunker is a hitscan game, it is extremely helpful to know the direction that an enemy’s bullets are coming from.
Muzzle Flash: Renders a flashing near the muzzle of your weapon when you are firing to make it feel more immersive.
Recommendation: OFF. Although the effect is neat, it’s distracting - especially if you are trying to track the enemy in the middle of a fight.
Sniper Flap: It’s literally a flap for your sniper scope to protect it from dust lol.
Recommendation: Doesn’t Matter. Use it or not to suit your style.
Dynamic Shadows: a new setting that renders a shadow that follows the player. Adds a lot of depth and realism to the game. Note: it can be buggy but overall I really like it. It’s better explained in video, so you can watch the one I did on Dynamic Shadows:
Texture and Object Animations
They refer to the animations on certain skins (like the Raynbow and “code” skin for AR/Sniper). Turn it off for better performance. But it’s not a big hit to performance if you leave it on. So I’d adjust if you are having issues or if you don’t like the look of the animations.
Screen Shake
Literally it’s what it sounds like! The screen shake effect in Krunker is pretty mild though compared to other games (I’m looking at you, COD). So personally, I like to keep it on.
Weapon Shine
If your weapon has a shining effect to simulate the appearance of a light source. ON for best looks and OFF for better performance.
Lighting (LOW, NORMAL, HIGH)
A recent addition, it gives us options to select the quality of lighting! This is a cool feature and results in big changes to framerate. NORMAL and HIGH will look similar to what the game looks like in the past without the option. The HIGH setting results in everything looking a lot sharper and smoother with less grain/noise.
The LOW setting results in a drastically different look. Some people may like the appearance, others will hate it. The LOW setting reduces the dynamic range a lot of the image (kind of like an HDR effect). This means the difference between bright parts and dark parts are a lot lower. The image ends up looking really “flat”. In theory, this would be good for a competitive advantage in many other FPS games that rely on stealth and target-spotting. But visibility is not really a big concern in Krunker. You can use the low setting if you don’t mind the appearance and if you want the highest possible framerate.
INTERFACE SECTION (CUSTOMIZE WHAT YOU SEE ON YOUR HUD

UI Scale
I find this to be a really useful setting that lets you choose the size of onscreen elements (scoreboard, chat, etc.) I’m playing on FHD and find that a setting of 0.6 is nice - I can see more of the action in-game. You will just have to test this setting and find the best UI scale for yourself.
A UI Scale of 0.6
Show UI
A useful setting when recording cinematic footage but otherwise should be left OFF.
Dynamic HP Bars
If turned on, when you damage an enemy, you can see their health go down (instant of the HP being changed instantly). However, I think it’s more clear in fights having this setting turned OFF. Secondly, it’s a bit redundant if you have the next setting turned on.
Show Damage
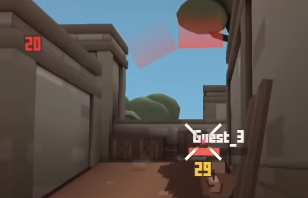
Much like an MMO game, you see your damage with onscreen numbers.
This is a really great setting that was added to the game and I keep it turned ON. The thing with Krunker is that there is no blood (which makes sense given the style of the game). But there wasn’t much visual feedback of when you landed a shot. The numbers make all the difference for that visual feedback.

With the Damage Color, Crit Color (headshot) and Damage Scale options, you can customize the onscreen numbers to your liking. If you find the numbers blocking your vision, you can turn down the Damage Scale setting.
Various SHOW Options

For the most part, keep the options above turned ON for maximum information while in-game. You can turn off unboxings and palyer messages if you find them distracting.
SHOW MOVEMENT SPEED
A very cool setting for learning! But at the moment, I do not feel like it shows movement speed reliably and there were vast differences depending on what framerate I was using (for some reason, I was getting much higher numbers playing at 60FPS). Keep off for now.
NAMETAG DISPLAY AND NAMETAG STYLE
I def keep the Nametag Display setting on “Everyone” to give you max information. Nametag style, I use at default but I can see the “name only” or “health only” options being useful to reduce onscreen clutter.
CHAT SECTION

The chat section is mostly self-explanatory.
Show Chat Box: either “always”, while focused, or off.
Some streamers like to have chat turned off in case chat has bad language. Also, chat can be distracting as well. I prefer to keep it on but maybe I shouldn’t since I try to respond to people. Good conversion tho.
Show player messages - similar function as above, but you can keep other info in the feed like unboxings while filtering out player messages if you desire.
Chat Opacity - a useful feature to give a “clean” transparent look to your UI while still keeping chat visible.
The background of chat - to provide further contrast to the text
Chat text outline - puts a “stroke” on the text"
Height - Resize chat
Chat timer - sometimes chat moves too fast, sometimes too slow, so you can customize this (I haven’t done it yet)
CROSSHAIR SECTION

From left to right, you have Default, Custom, Layered, and Image options for the crosshair.
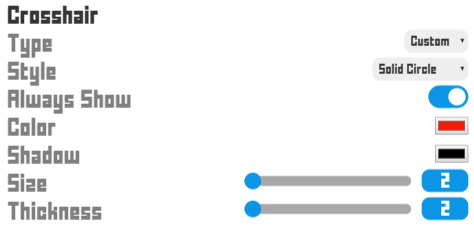
Within the “Custom” setting, you can make a variety of tweaks of color, shape, and size.
When it comes to your crosshair it REALLY is all about personal preference. I remember when Overwatch was starting to be played competitively, people came from a variety of game backgrounds so crosshair choices were highly variable. Some people like Counter-Strike players may prefer a cross. I prefer a small circle.
In general, you should turn off the default crosshair once you get a feel for how recoil works in Krunker. I recommend using the Custom setting or uploading your own crosshair as an image.
GAMEPLAY SECTION
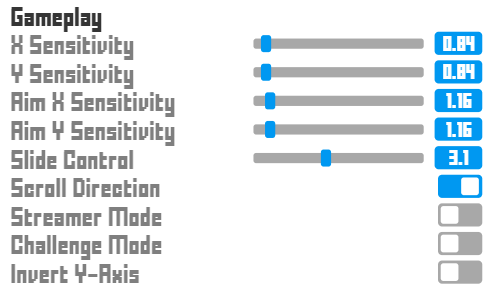
X&Y Sensitivity — you can control your vertical and horizontal sens independently. Krunker is a VERY sensitive game so I tend to turn the sensitivity values way down (I use the sens in the picture above w/ a mouse DPI of 500).
Aim Sensitivity - this is aim-down-sights sensitivity. You should experiment with this - I personally find an aim sens slightly higher than the standard sens to be a good balance between fast target-switching and control. (feels about 1:1)
Slide control - a very important NEW setting. This allows players who are getting lower FPS to be able to receive similar benefits of extended slide distance and speed gained from sliding repeatedly. This may change, but I find that a value between 3 and 6 is best right now, regardless of your hardware or FPS that you get.
Streamer Mode - I have never used it but supposedly it censors profanities in chat. Hopefully it will have more functions in the future.
Scroll direction - inverts settings scroll direction
Challenge Mode - you don’t regenerate health but you get 1.5x points. Good for girding XP or KR. Usually played in combination w/ Hunter. I probably only used it a few times.
AUDIO SECTION

By default, the volume in Krunker is WAY TOO LOUD. I recommend turning it down a lot. I use a setting of 0.2 for both voice and sound.